HX-120B Wire Terminal Crimping Tool User Manual
1. Safety Instructions
- Personal Protection: Always wear safety glasses and gloves during operation to prevent injury from flying debris or electrical hazards.
- Work Environment: Ensure the work area is well-ventilated and free from flammable materials. Avoid using in explosive atmospheres.
- Tool Handling: Do not modify the tool’s design or use it for purposes other than terminal crimping. Keep away from children.
- Maintenance: Regularly inspect for wear or damage; replace parts immediately if compromised.
2. Product Overview
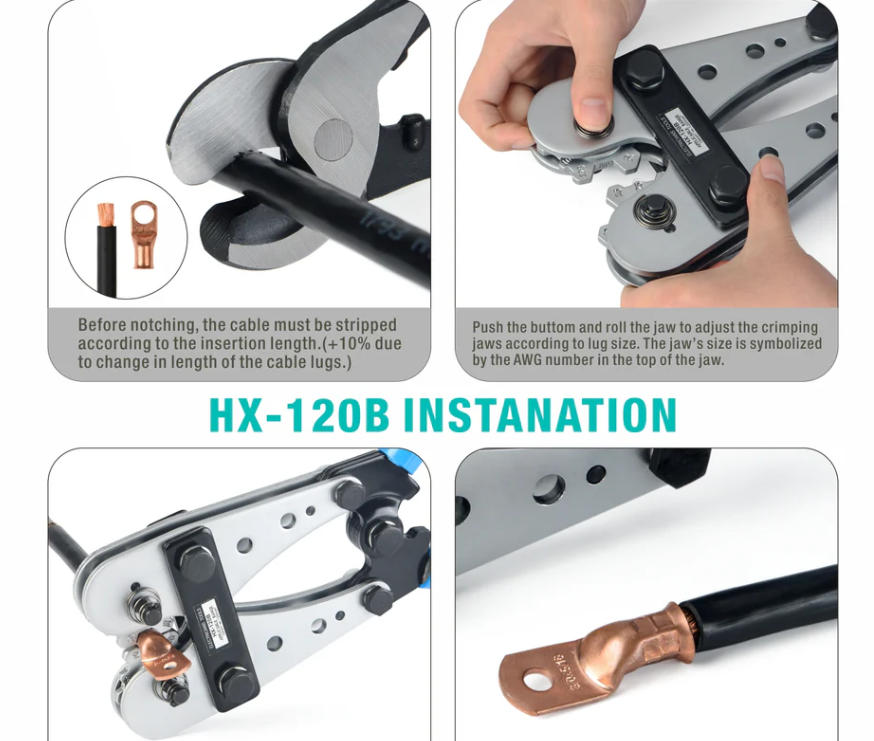
The HX-120B Wire Terminal Crimping Tool is a precision tool designed for high-volume electrical projects, offering durability and efficiency in crimping terminals. Its robust construction ensures long-term reliability in industrial settings.
Key Features
- High-Speed Operation: Optimized for rapid crimping cycles, reducing downtime in production lines.
- Precision Engineering: Ensures consistent crimp quality for secure electrical connections.
- Durable Build: Resistant to wear in demanding environments, enhancing tool lifespan.
- User-Friendly Design: Intuitive controls minimize training time and improve workforce productivity.
- Bulk Purchase Ready: Ideal for wholesale procurement, supporting large-scale deployment with cost savings.
3. Installation and Setup
3.1 Unpacking
- Inspect the tool upon delivery for any visible damage.
- Verify all components (e.g., crimping dies, handles) are included as per the packing list.
3.2 Initial Use Preparation
- Power Connection: Ensure the tool is unplugged during setup.
- Die Selection: Choose the appropriate crimping die for your terminal type (e.g., DT terminal for M16 bolts, as used in high-torque applications).
- Calibration: Check alignment using a reference terminal; adjust if necessary to avoid mis-crimping.
4. Operation Guide
4.1 Basic Crimping Procedure
- Insert Terminal: Place the terminal into the selected die cavity.
- Position Wire: Insert the wire into the terminal’s conductor section.
- Crimp Execution:
- Squeeze the handles firmly until the tool’s indicator confirms full crimp.
- Release handles to open the die; remove the crimped assembly.
- Inspection: Verify crimp integrity by checking for secure wire retention and no terminal deformation.
4.2 Advanced Tips
- Batch Processing: For high-volume tasks, organize terminals in batches to streamline workflow.
- Quality Checks: Use a magnifier to inspect crimp profiles for consistency, especially in critical applications like automotive wiring.
5. Maintenance and Care
5.1 Regular Maintenance
- Cleaning: Wipe down the tool after use to remove metal shavings or dust.
- Lubrication: Apply light oil to moving parts monthly to prevent corrosion.
- Die Care: Clean dies with a soft brush; replace if worn or chipped.
5.2 Troubleshooting
- Problem: Poor crimp quality (e.g., loose wires).
- Solution: Check die alignment and terminal size match; recalibrate if needed.
- Problem: Tool jamming.
- Solution: Ensure no debris blocks the die cavity; inspect for bent components.
6. Technical Specifications
- Crimping Capacity: Compatible with terminals from 10 mm² to 120mm² cross-section.
- Force Range: Adjustable dies accommodate various terminal sizes (e.g., M6 to M16 bolts).
- Environmental Limits: Operate within -10°C to 50°C; avoid exposure to moisture or extreme temperatures.